Online Booking and Appointment Scheduling widget for Webflow
The Webflow Booking Solution is crafted to seamlessly integrate a comprehensive booking system into your Webflow site. It empowers businesses to efficiently manage appointments, enhance customer engagement, and streamline operations — all while preserving the design integrity and user experience that Webflow is known for.
Key Benefits
- Effortless Integration. Add the booking system to your Webflow site with minimal coding, ensuring a smooth user experience without disrupting your site's design.
- Mobile-Responsive Design. The booking interface is optimized for all devices, providing a consistent and user-friendly experience across smartphones, tablets, and desktops.
- Intuitive User Interface. Designed for simplicity, the booking system allows users to schedule appointments easily, enhancing customer satisfaction.
- Flexible Service Management. Define and manage services, set availability, and customize booking parameters to align with your business operations.
- Secure Payment Integration. Accept payments through various methods, including credit cards and digital wallets, with secure processing to ensure customer trust.
- Scalability. The system is built to accommodate businesses of all sizes, offering features that grow with your needs.
- Comprehensive Support. Access detailed documentation and responsive support to assist with setup and ongoing management.
Usage
With this app, you can allow users to seamlessly schedule services directly from your webpage.
By default, the widget displays a form for single-session appointments in test mode.
To view the widget as it will appear with your specific service, connect it to your service in the Bookla Platform.
Prerequisites
Webflow Account. Ensure you have a Webflow account and access to the project where you want to add the booking system.
Ensure you have the necessary permissions in Webflow to add custom code and integrate third-party services.
1. Create a Company in Bookla if you have not yet
This step is essential as it links your company ID to the Webflow widget.
- Open the Bookla Platform landing page and tap ‘Create Account’.
- Use your credentials to create an account or log in.
- Create your company or use an invite code to open it.

2. Set Up Your Resources
Resources are fundamental to the appointment scheduling process in Bookla.
In the Bookla ecosystem, a "resource" is any bookable entity offered by a company. This includes Human resources (e.g., hairdressers, coaches, instructors) and Physical assets (e.g., tennis courts, guest houses, meeting rooms).
- Give a Name & Color.
- Set up Working Hours.
- Manage Availability. Recheck at the top right that your resource is
Enabledfor booking.
3. Set Up Your Service
A service in Bookla represents an offering provided by a company that can be booked by clients. Each service is linked to one or more resources.
- Give a Name & Color.
- Choose a Type. Ensure at least one service (Fixed, Flexible, Group, or Ticket) is created in your Bookla account. Select the type of component based on the features you need. Check the Comparison
- Add Settings, based on type. Refer to these guides for each type: Fixed, Flexible, Group, and Ticket.
- Choose a Booking Policy. Instant Booking, Needs Confirmation, or Needs Pre-payment (How to Add Payments).
- Set Up Price. Without it, your service will be free for users. How to Accept Payments.
- Manage Availability. Recheck at the top right that your service is
Enabledfor booking.
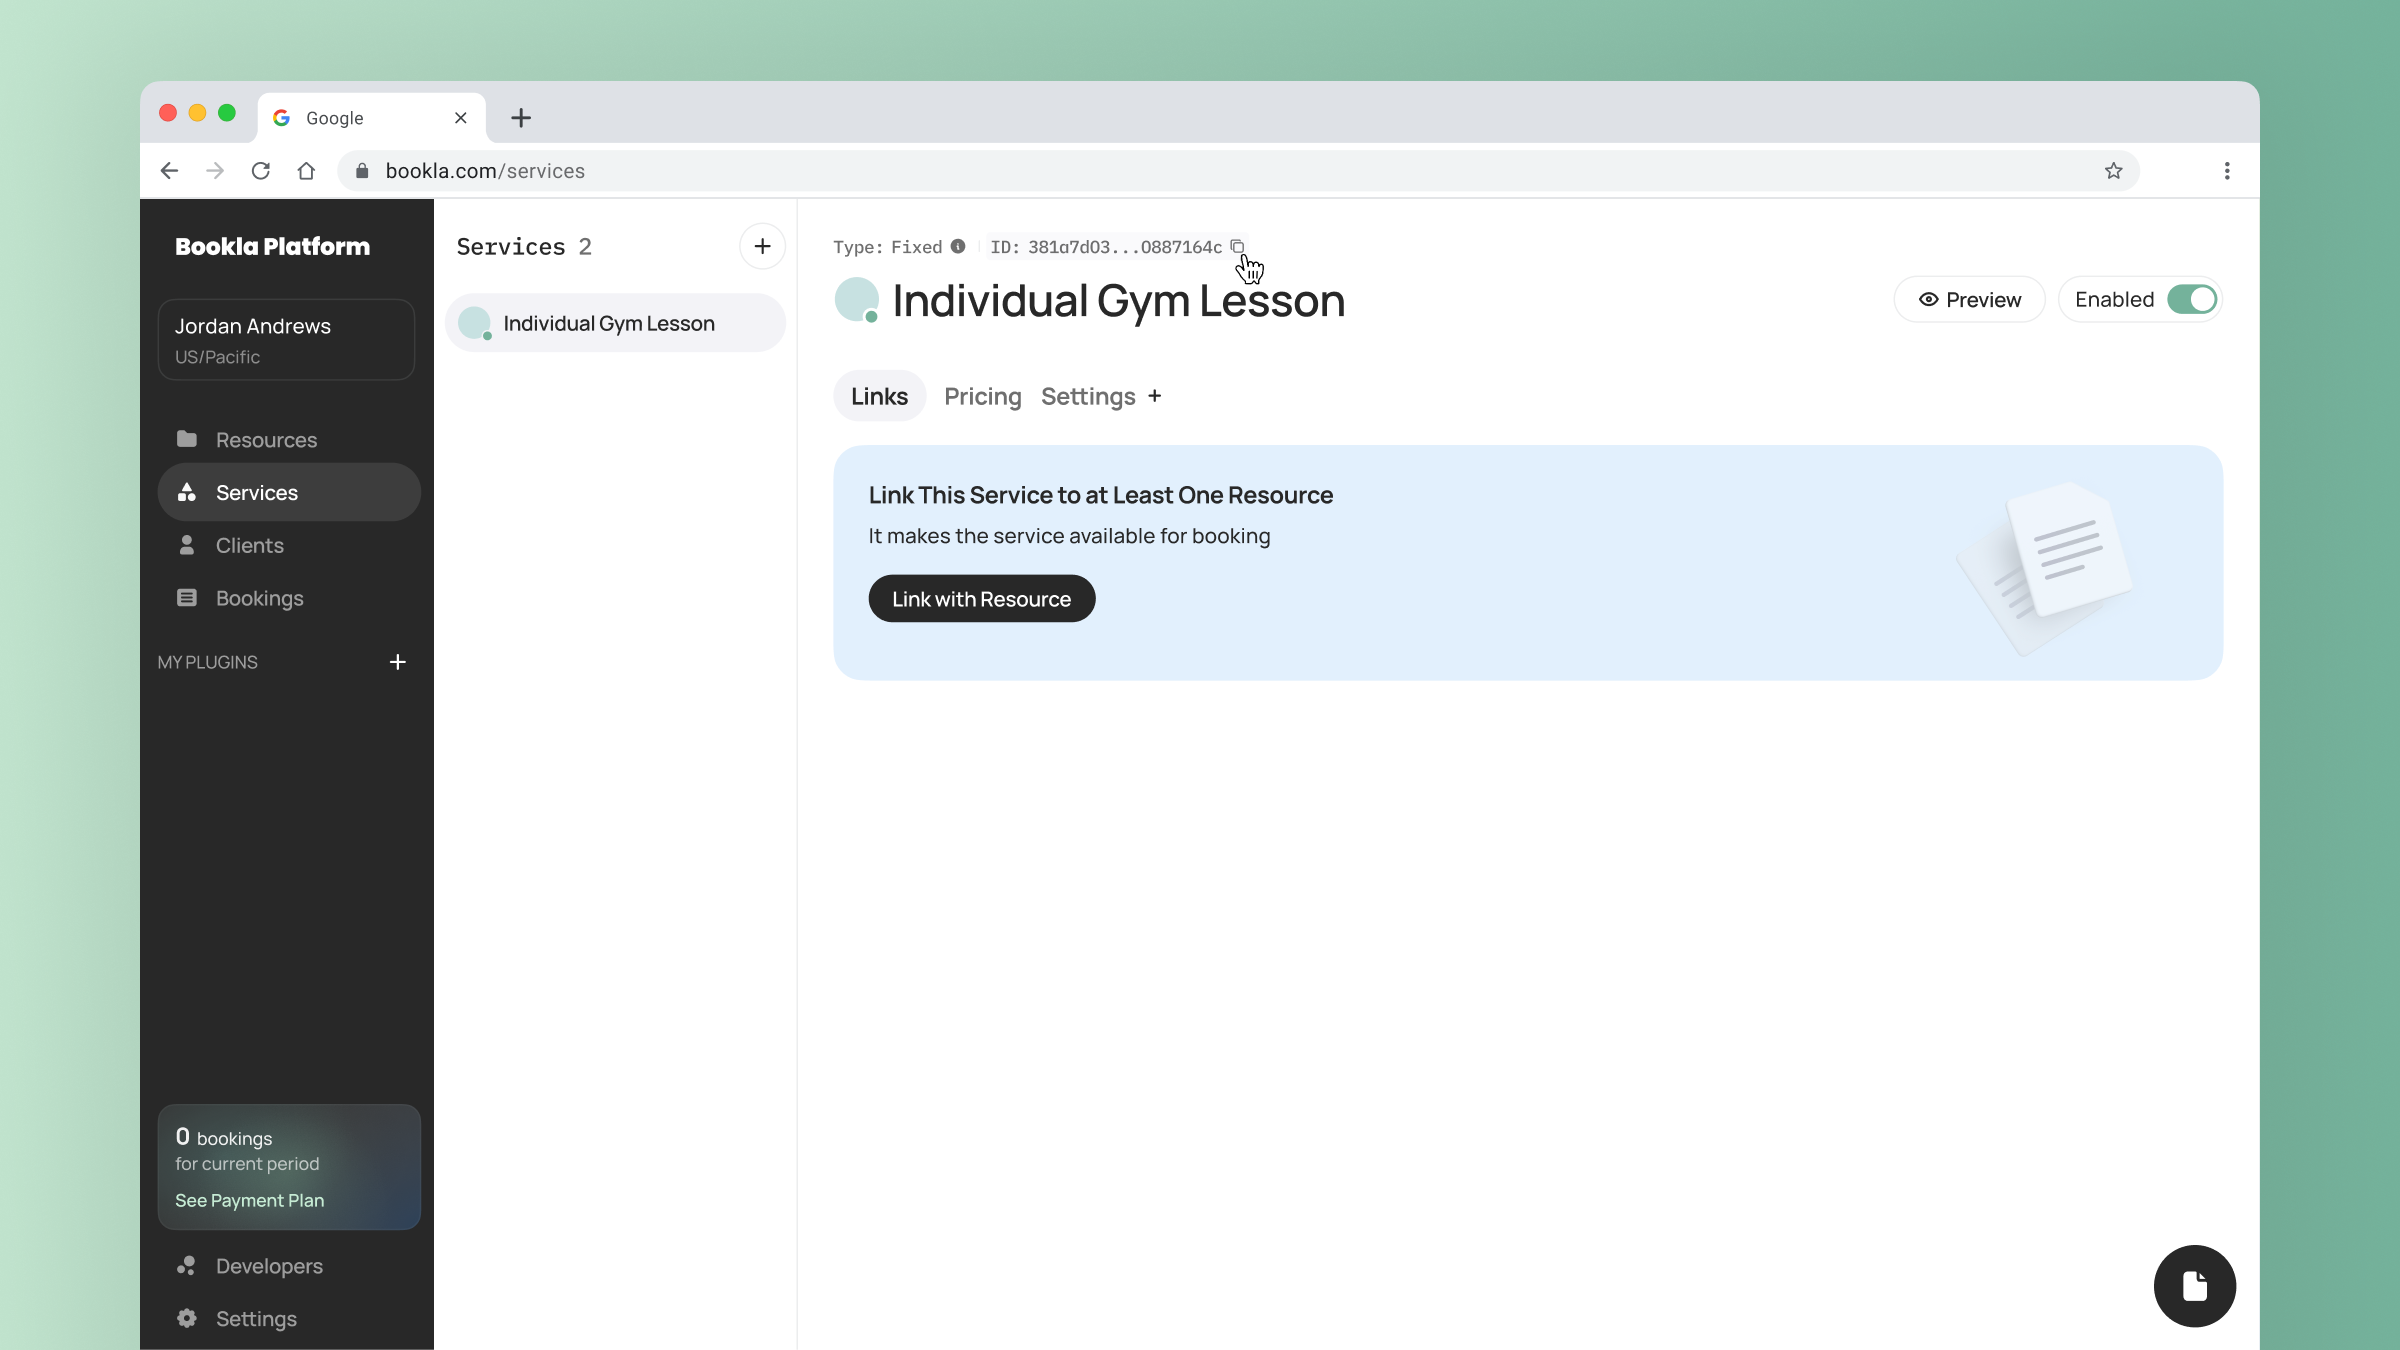
4. Link Your Service with Resource
To make a service available for booking, you need to:
- Go to Services.
- Select the ‘Links’ tab and press ‘Link with Resource’.
- Add one or multiple resources.
Now easily see how your customized booking widget will look and function by clicking Preview in the top-right corner of the service page. This feature allows you to test the design, interactions, and overall user experience before publishing it live, ensuring everything looks perfect!
The available booking times are dynamically determined based on the Working Hours and Closing Periods you’ve set for each resource. Ensure these settings are correctly configured in the Bookla platform to reflect accurate availability for your users.
Installation
1. Install the Bookla plugin in Webflow
- Visit the Webflow App Marketplace.
- Find the Bookla solution and select Install App.
- Select the project where you need to add the booking form and click Authorize App.
Or install the app directly from the Apps section on your Webflow Canvas:
- Select Apps.
- Type "Bookla" and Install to open it.
2. Open the Bookla Plugin in Webflow
- In the Webflow Designer, open the page where you want to add the booking system.
- Open the Bookla App.
3. Customize the Booking widget
- In the "Bookla API", select your API Region, and enter your Bookla company ID, service ID, and API key to link the widget to your Bookla account.
- Connect the widget with the Bookla Platform. In the settings panel, enter your Bookla company ID and API key.
4. Add to Canvas and Publish Your Site
- Press "Add to Canvas" to add the widget to your site.
- Publish your site to see the Bookla Widget.
Webflow App
The first part of the editing solution is organized into three main sections:
- API Bookla: Connects your Webflow project to your Bookla account to display real-time booking data.
- Theme: Customize the look and feel of the booking widget to match your website's design.
- Configure: Set up the widget's behavior and text to fit your booking process.
The second part of the editor's interface consists of the workspace where users can customize and preview the Bookla widget. This area includes several key elements:
- Button Panel. It offers a set of tools to manage your widget's settings effectively.
- Background Picker allows you to customize the preview area's background by selecting colors.
- Use Import from Canvas to retrieve settings from previously designed widgets. Copy your Bookla widget from the canvas, then click on the button to restore settings.
- Go to Platform provides a direct link to the Bookla Platform.
- Docs links to comprehensive documentation.
- Add to Canvas allows you to add the customized widget into your site's canvas.
- Preview Workspace. It’s the area where you can interact with your widget and view a live representation of it.
This structured layout ensures a user-friendly experience, enabling you to efficiently design and fine-tune your Bookla widget to seamlessly integrate with your website's aesthetics and functionality.
API Bookla
To connect your Webflow project to your Bookla account, you should have a Bookla account and need to fill in:
- API Region: Your Bookla service's region.
- API Key: Your unique Bookla API authentication key.
- Company ID: Your company's identifier in Bookla.
- Service ID: The specific service you want to integrate.
If these fields are left empty, the widget operates in Test Mode, showing a preview of a fixed-type service. You'll see a message: "Connect the Bookla API to add live data.”
Why Test Mode? It allows you to experiment and customize the widget before connecting to live data. Once you input the required details, the component will display real-time data for the service you've linked, supporting all service types except Days.
How to Fill API Bookla Fields
To find your API Region in the Bookla Platform:
- Check the beginning of the URL in the platform. For example, if you're in the USA, it will start with "us". Currently, only "us" and "eu" are available.
- Select the region that corresponds to your version of the Bookla Platform.
To generate your API Key in the Bookla Platform:
- Navigate to the Developers Section. In the bottom-left corner of the menu, click on Developers.
- Select the API Keys section.
- Create a New API Key. Click on Create API Key.
- Name Your API Key. Provide a descriptive name for the key (e.g., "Webflow Integration Key").
- Set Permissions. In the Client Permissions section, select the appropriate permissions for your API key.
- Generate and Copy Your API Key. Click Create to generate the key, then copy it immediately. The full API key will be displayed only once; ensure you store it securely.
- Paste the API Key into the Webflow App. In your Webflow application, paste the API key where required to establish the integration.
To locate your Company ID in the Bookla Platform:
- In the top-left corner of the menu, find the card representing your company. Click on this card to open the company details.
- Find the Company ID. At the top of the company's detail view, your Company ID will be displayed.
To copy your Service ID in the Bookla Platform:
- Go to Services and select the service you want to connect.
- Find the Service ID at the top of the service's detail view.
Theme
With the theme, you can customize:
- Style. Select a theme type or upgrade common colors for the widget. Pre-defined themes can update all settings.
- Layout. Adjust common spacing settings to affect the overall layout; changes are reflected in real-time for clarity.
- Typography. Change the font family, update font sizes and weights, and customize line heights.
- General Element Style. Adjust specific layout settings (like padding) and colors for any state. You can customize: Buttons, Item, List, Form, Summary.
Style Settings
The Bookla Platform offers pre-made themes that you can use to style your widget. These themes are ready to apply, but you also have the option to customize them to better fit your brand or personal preferences.
- Theme. The overall design and style applied to your booking widget. Provides a consistent look and feel, aligning with your brand's visual identity.
- Background. The color that fills the background of the booking widget.
- Text. The primary color used for main text elements, such as headings.
- Secondary Text. The color applied to secondary text elements, like descriptions and labels.
- Error. Used to indicate errors, such as an "X" icon when a booking fails or an asterisk (*) next to required fields.
- Success. The color used to highlight successful actions, like a checkmark on the Success Screen.
- Border. The color and style of the borders around the booking widget.
Layout Settings
In this section, you can update the following settings:
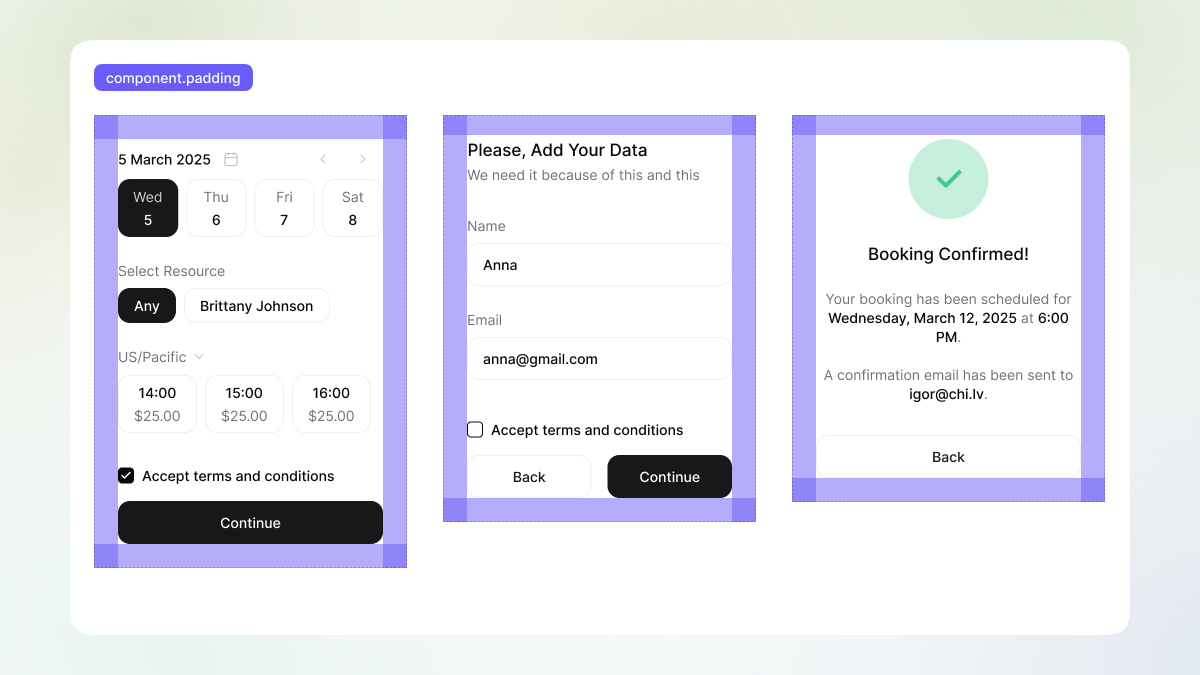
- Padding. The space between the content of a widget and its border.
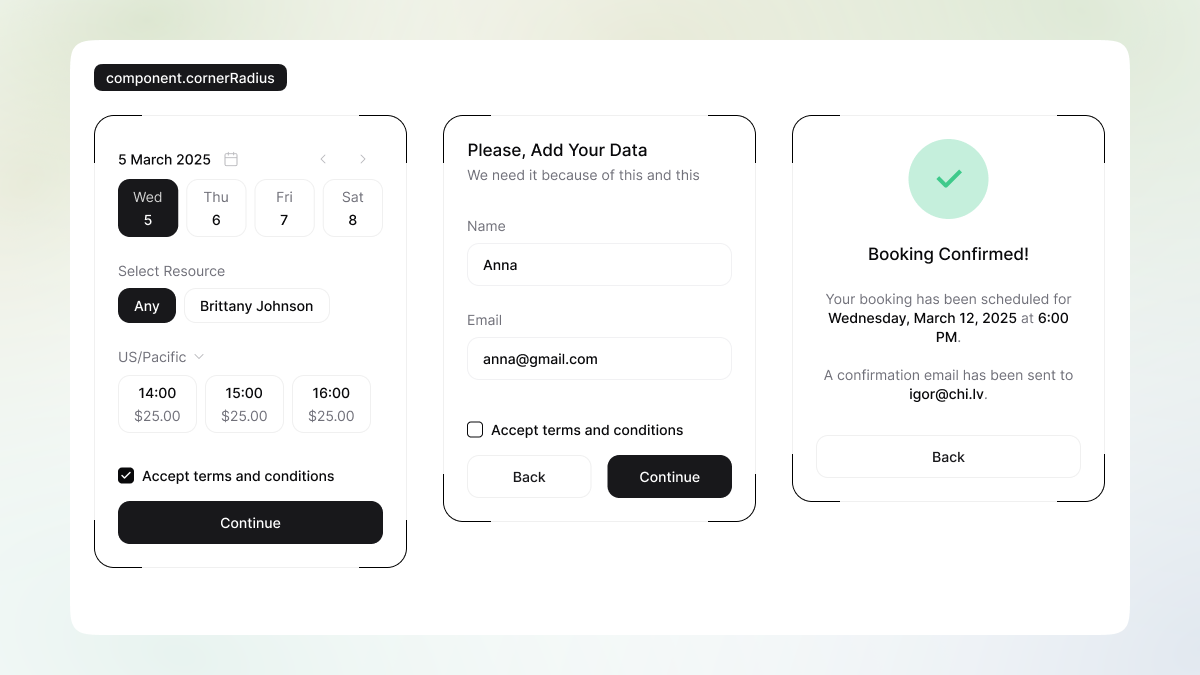
- Corner Radius. Controls how rounded the corners of a widget are.
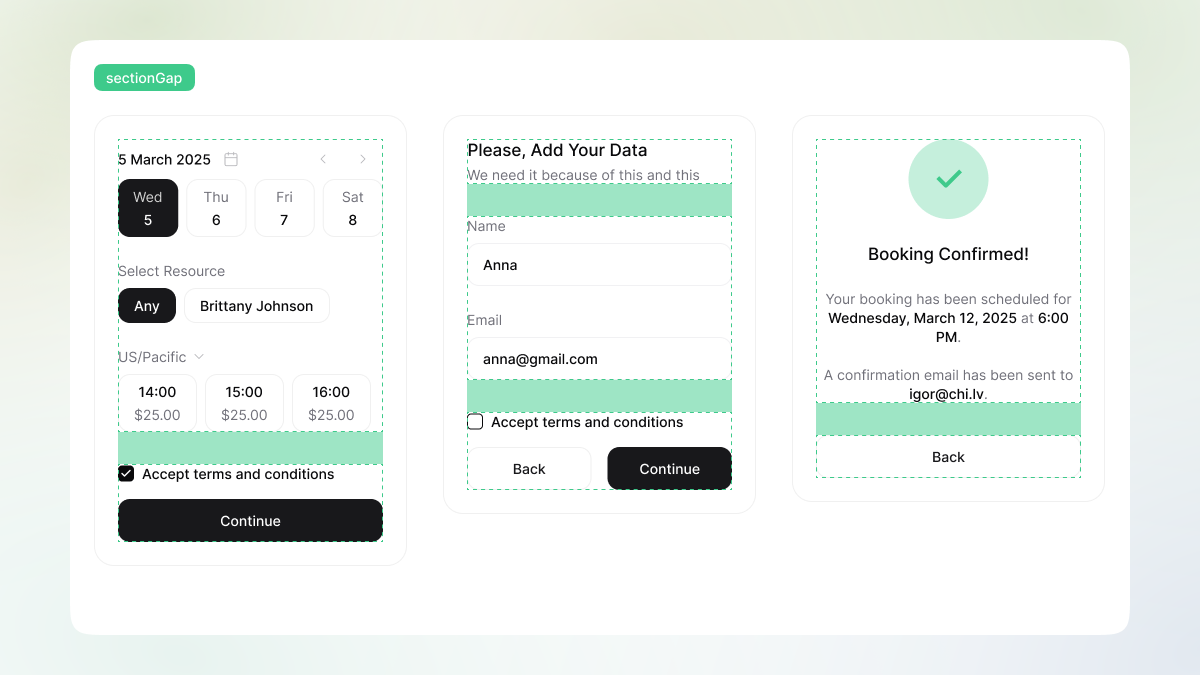
- Section Gap. Defines the space between different sections of content: header, content, and footer.
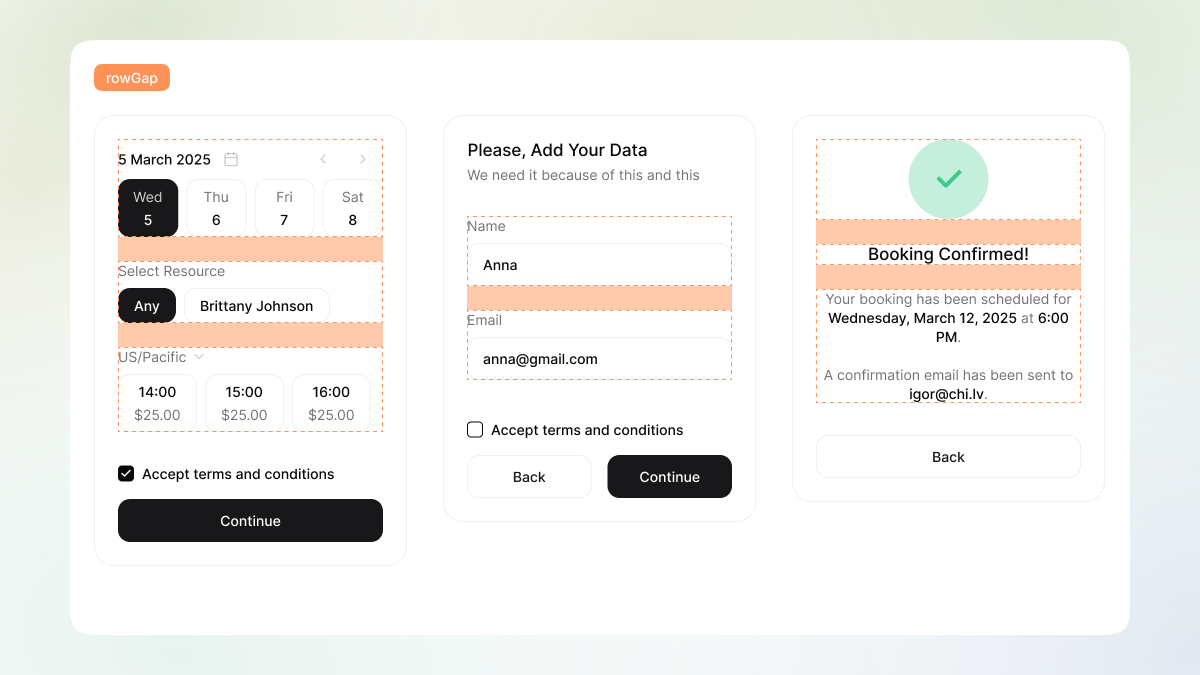
- Row Gap. The space between item groups.
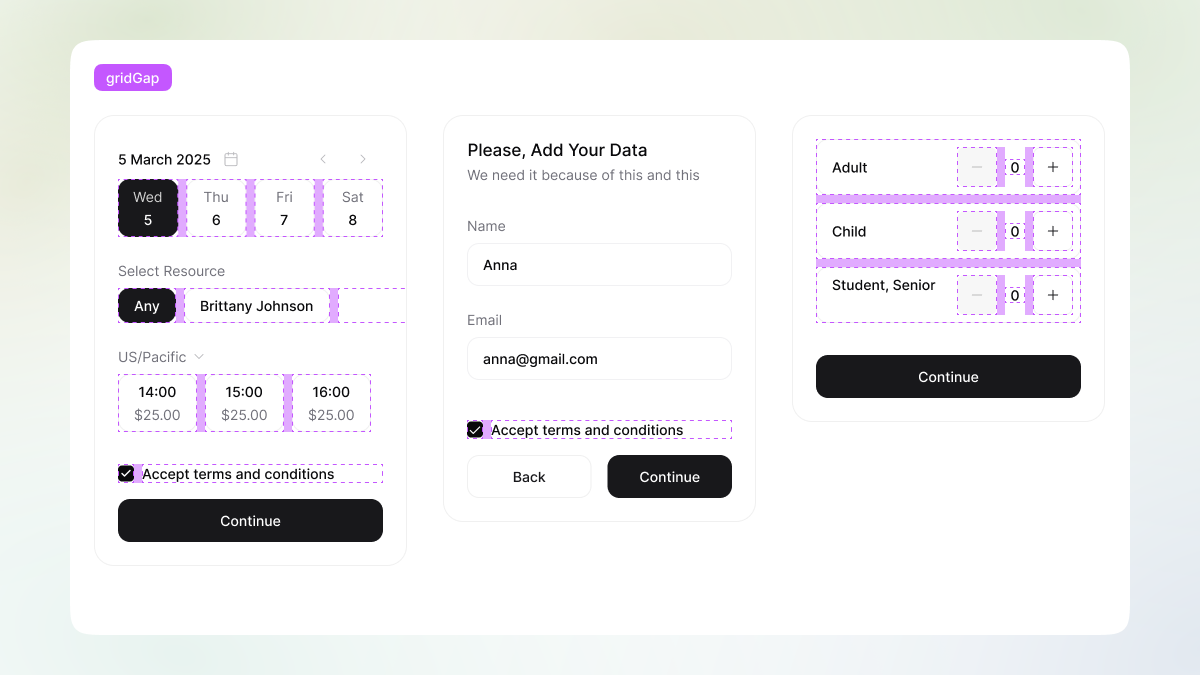
- Grid Gap. The space between items in a grid layout.
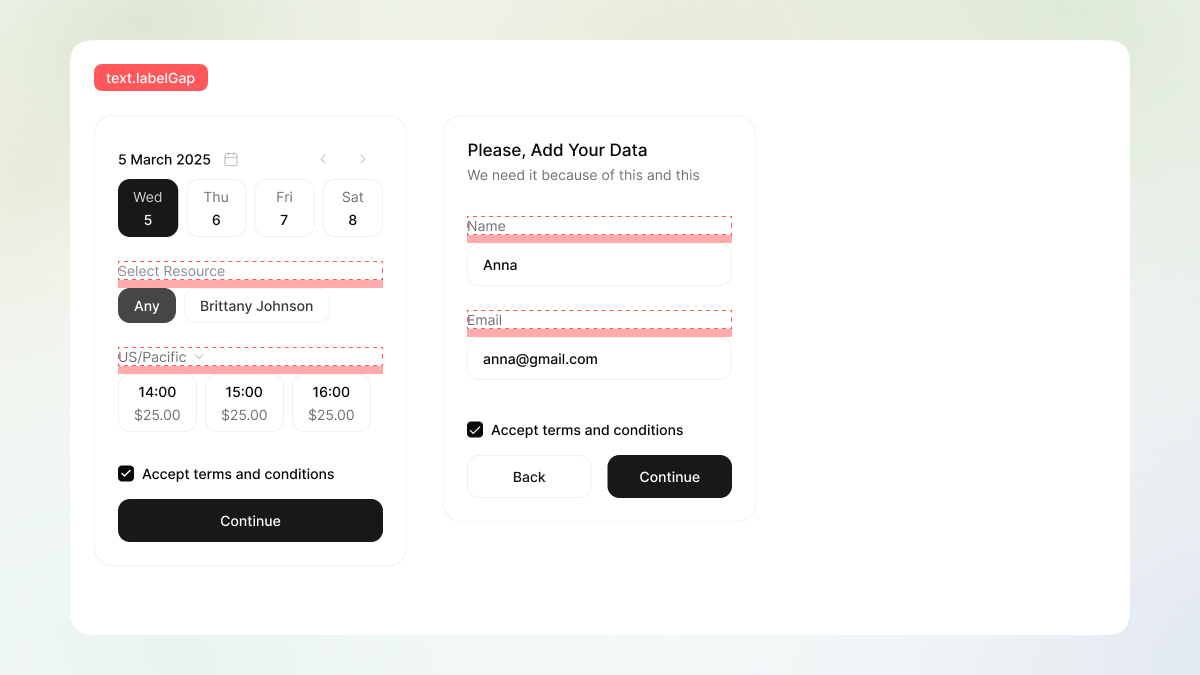
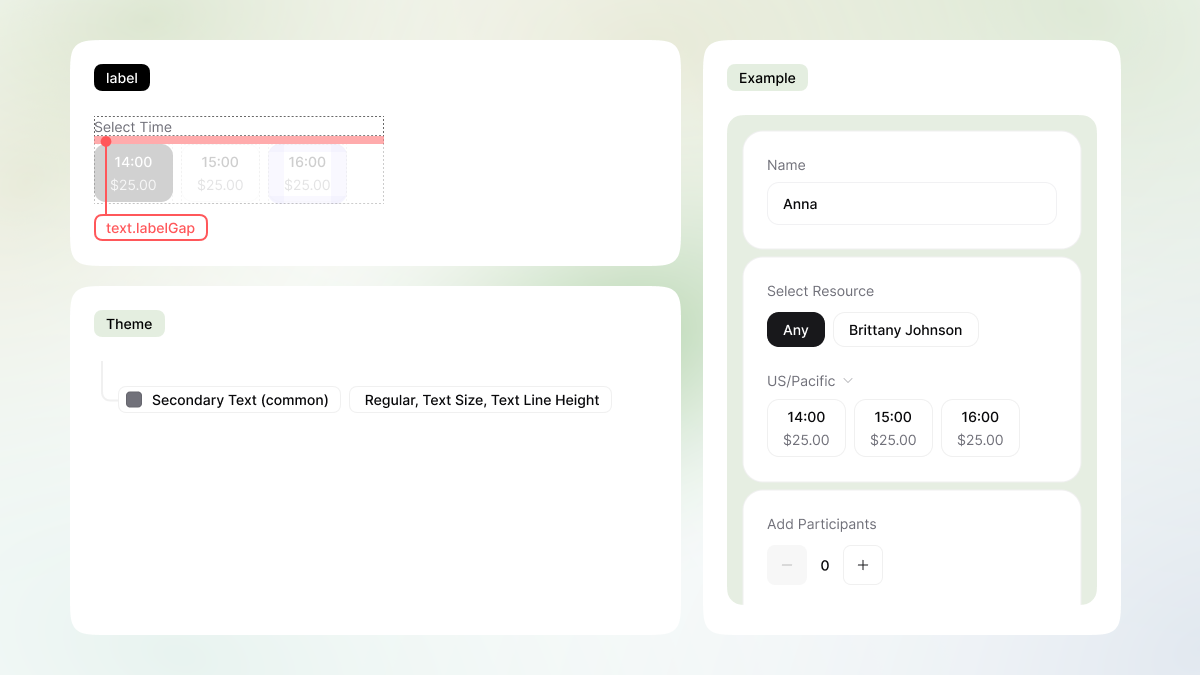
- Label Gap. Determines the space between labels (like field names in forms) and their corresponding input fields.
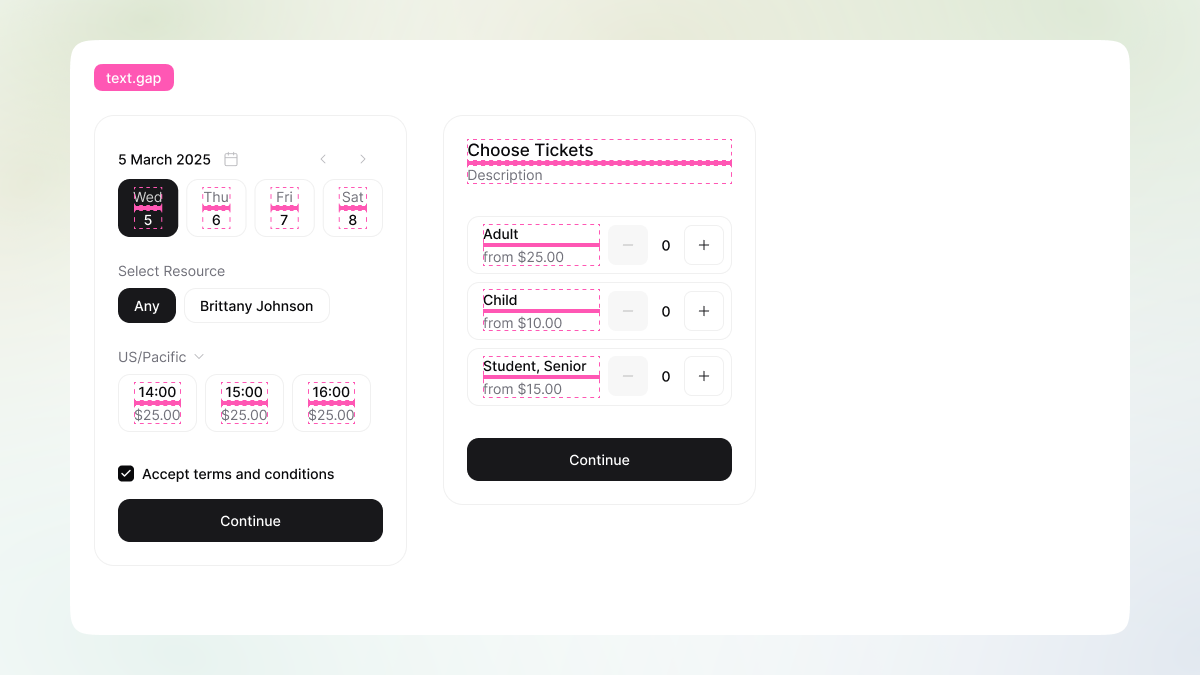
- Text Gap. Sets the space between text elements, such as words or blocks of text.
Typography Settings
In the Bookla Widget for Webflow, you can easily adjust the typography to match your brand. Here's what you can customize:
- Font Family. By default, it uses the font stack: Inter, system‑ui, sans‑serif. This ensures your text looks modern and clean. You can update it.
- Font Weights. We use Medium (500) for headers and key elements like button titles, while Regular (400) is used for secondary texts. You can change them.
- Font Sizes. Customize Title Size for headings and Text Size for your main content.
- Line Heights. We use 1.3 for clear, compact headings (Title Line Height) and 1.35 for easy readability in paragraphs (Text Line Height).
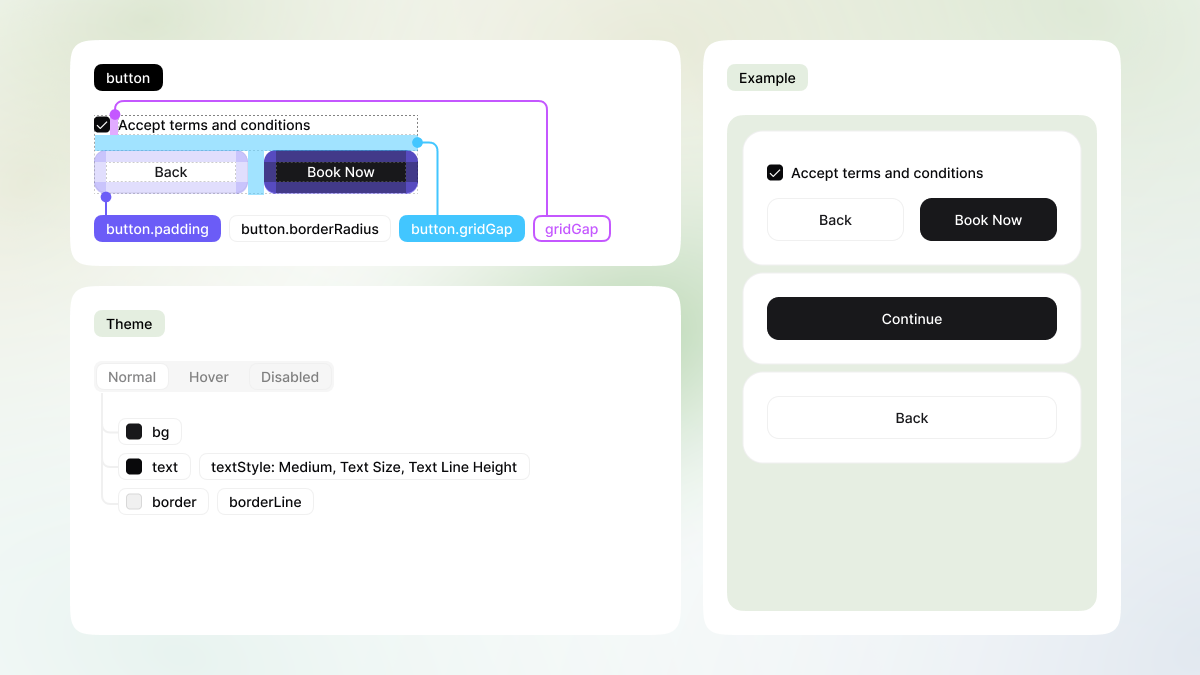
Button Settings
This section lets you style different button types in your Bookla Widget for Webflow. You can adjust properties like padding, corner radius, background, text or icon color, and border for each button type in their normal, hover, and disabled states.
- Primary Button.
- Secondary Button.
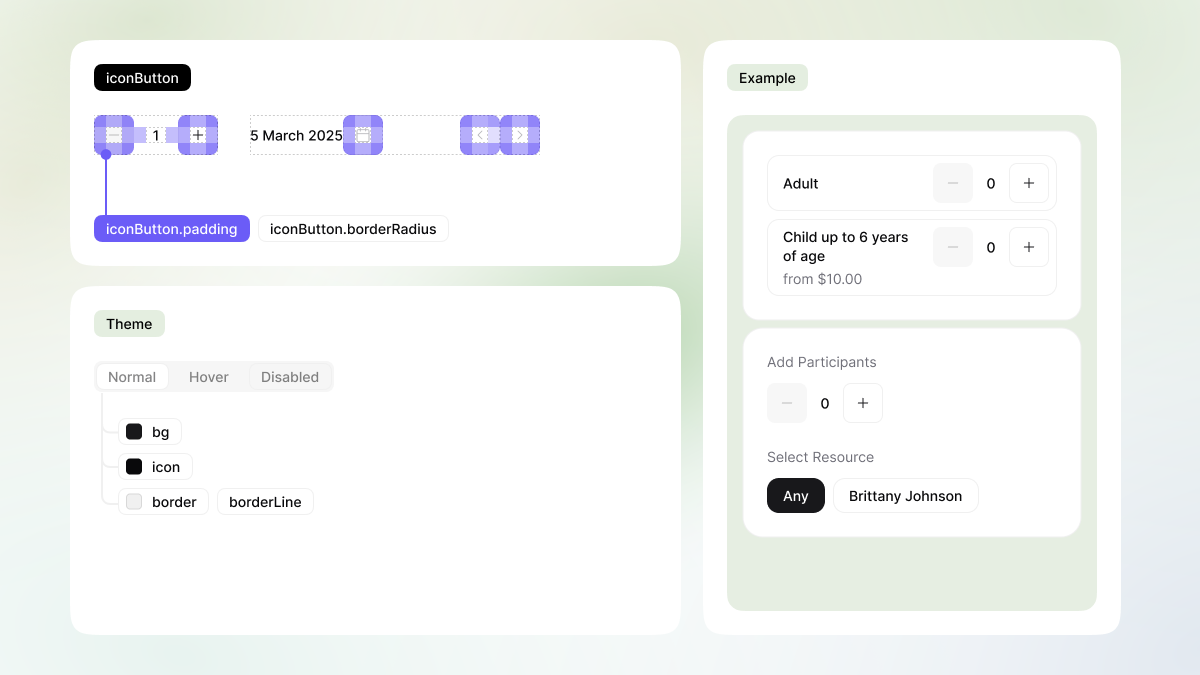
- Icon Button.
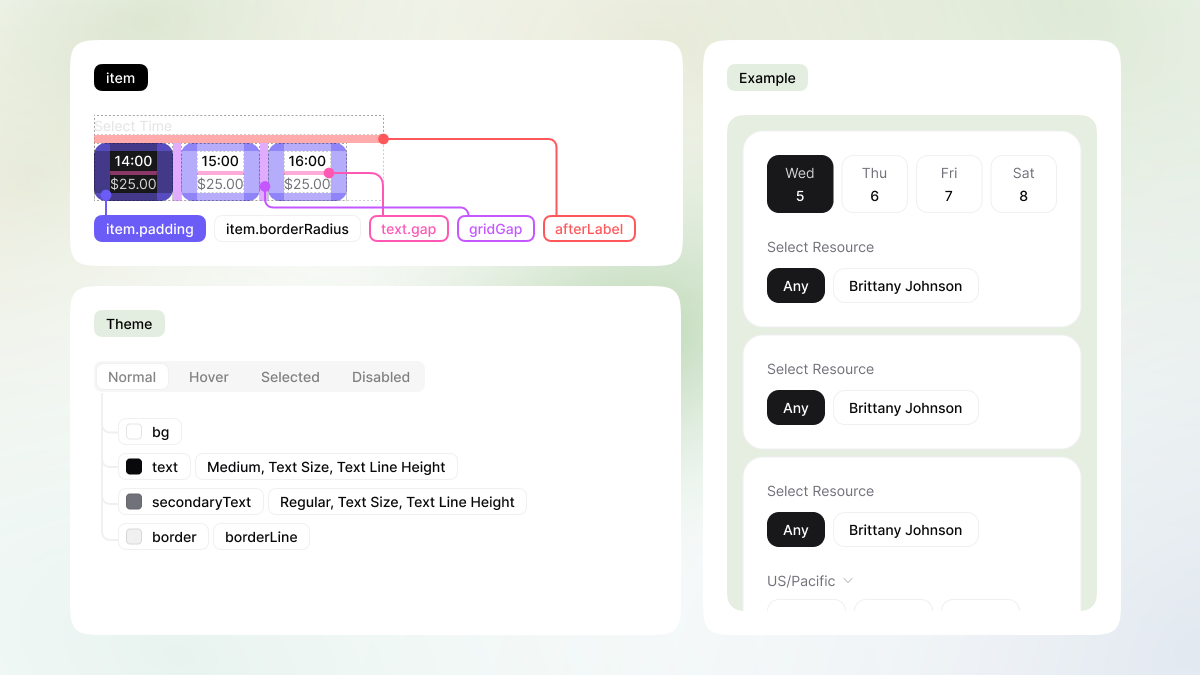
Item Settings
This section lets you style any selectable element in your Bookla widget, such as dates, available times (with or without price), and resources.
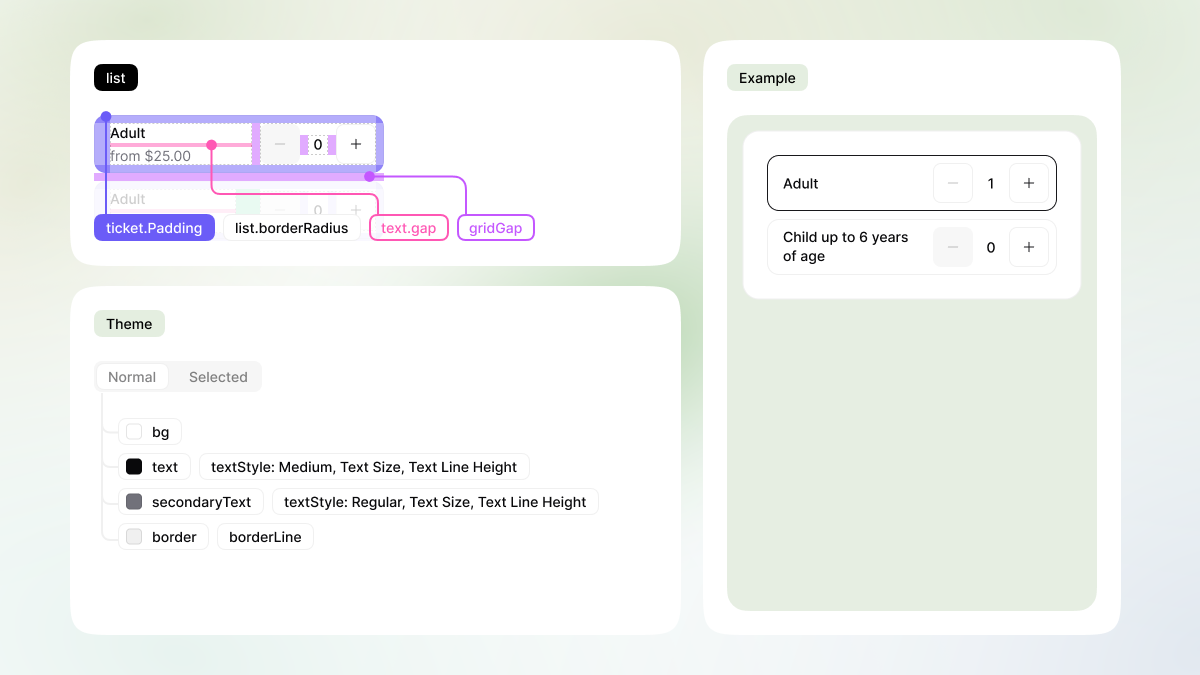
List Settings
The list settings control the appearance of the ticket list. Currently, we use this list to display tickets, and in the future, it will be connected to service selection.
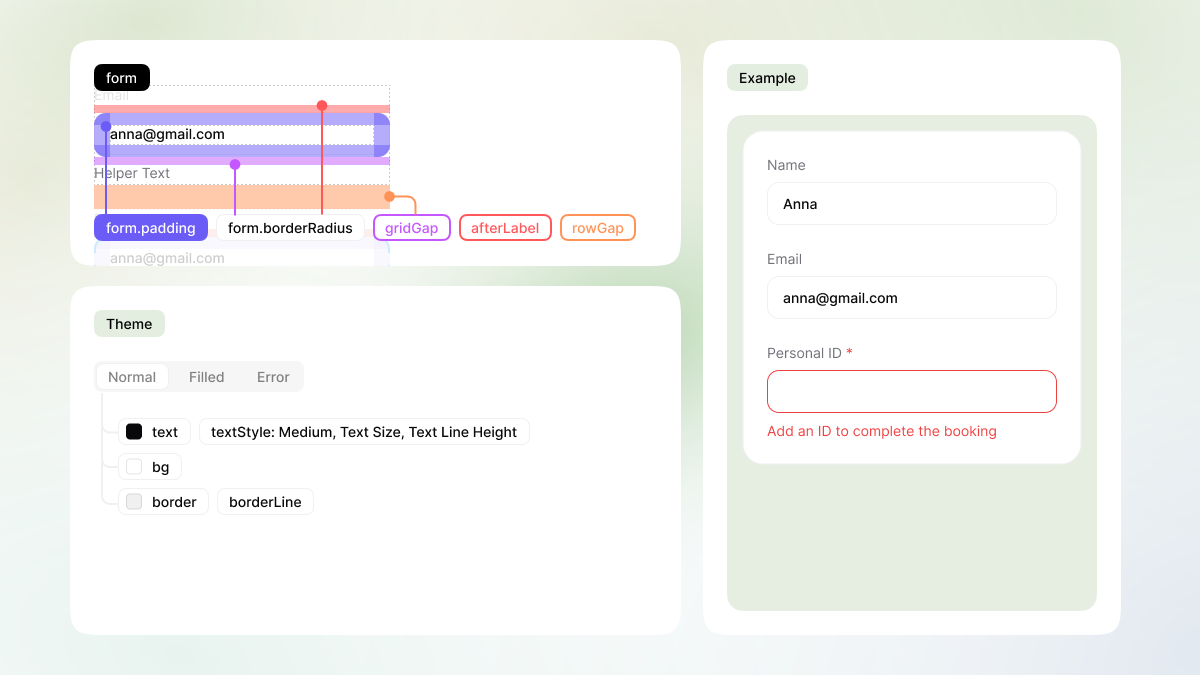
Form Settings
Form settings refer to the input fields and how their different states are configured (normal, hover, focused, disabled). These settings let you control the appearance and behavior of input elements, ensuring a smooth user experience when entering or editing information.
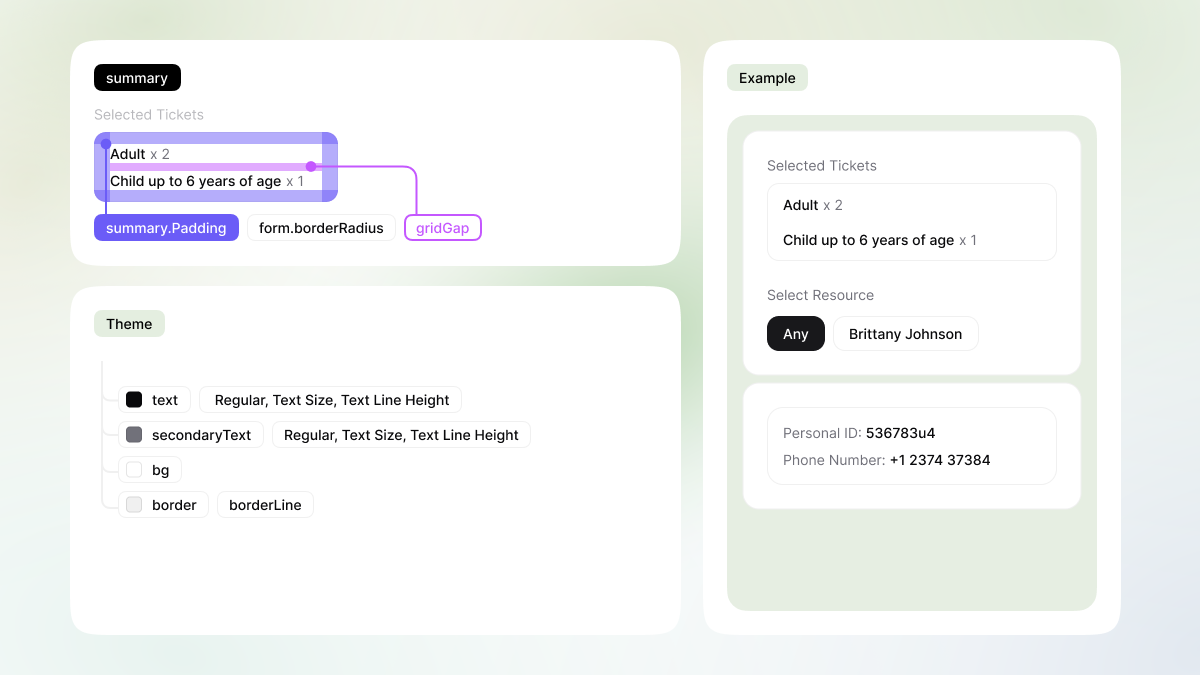
Summary Settings
Summary settings are used for the card that shows additional selections. For example, if a user chooses tickets, the summary displays the chosen options. This card is also used on the Success Screen to provide extra information about the booking.
Config
The Config section lets you control how the booking widget behaves and what text it shows. Here’s what you can do:
- General Settings. Choose an animation style and set the locale. The locale affects the date format and the language used in the widget.
- Time Settings. Customize labels for time selection. You can change the text that appears when no times are available or when times are still loading.
- Resource Settings. Enable a resource selector and set labels like “Select Resource” and “Any Option” for flexible resource choices. About Resource
- Guest Mode. Allow bookings without logging in. You can change the labels and error messages for required fields like first name, last name, and email.
- Set Up Text for Different Cases.
- Success Screen. Set up the title and description for after a booking is confirmed. Use placeholders like
{{date}},{{time}}, and{{email}}to show dynamic information. - Pending Screen. Adjust the title and description for bookings that are waiting for confirmation.
- Success Screen. Set up the title and description for after a booking is confirmed. Use placeholders like
- Error Screen. Change the title and description that appear when something goes wrong with the booking.
- Button Settings. Define the text for buttons, such as “Book Now,” “Please Log In to Book,” and “Back.” You can also set the loading text.
- Group Settings. Set the title for selecting the number of participants for group bookings.
- Duration Settings. Choose the title and options for booking duration.
- Tickets Settings. Set up the title for ticket selection, messages for when no tickets are available, and text for the continue button. You can also set up a summary title for the selected tickets.
- Terms and Conditions. Enable a required checkbox for terms and conditions. Customize the text and add a link to your terms page.
- Custom Form. Add extra fields if you need to collect additional information from users.
Testing the Integration
- Debugging Tips. Double-check that you’ve added
API Region,API Key,Company ID, andService ID. - Add to Canvas. Add your ready-for-implementation widget to the Canvas.
- Publish Webpage with Your widget. Test the look and functionality of your booking widget.
You're now ready to fully integrate and customize your Bookla booking widget in Webflow!
With a flexible design system and real-time data synchronization, you can deliver a seamless booking experience to your users.